This past week, Drydock Dreams Games released the long-awaited demo for Task Force Admiral – Vol. 1: American Carrier Battles, a real-time war game that will eventually cover the US perspective on the naval war in the Pacific between late 1941 and early 1943. While it would be unfair to “review” a free demo based on a very early alpha build, I did spend a couple dozen hours in the demo over the past few days and wanted to share my impressions of the experience – the good and the bad. There is no “ugly” when it comes to Task Force Admiral: this is so clearly a labour of love by its creators that, even with many rough edges, it’s easy to get excited by this hands-on slice of its full potential, especially when it already looks so good. But what is it like to play?
The demo, available on Steam, weighs in at a little over 5.5GB and offers a pretty generous amount of content: a full May 8th, 1942 Coral Sea scenario, a quick battle generator (that can be used to cook up some variations with more or less the same units and objectives as the Coral Sea battle), and an instant-action preview of what controlling an airplane directly might be like in the final game – plus a 46-page manual to help get the player started. The main scenario comes with not just an extended text briefing, but also a full video and voiceover intro – really showing off the developers’ dedication to not just the substance of the game, but also the presentation and packaging.
Stunning Visuals & Scale
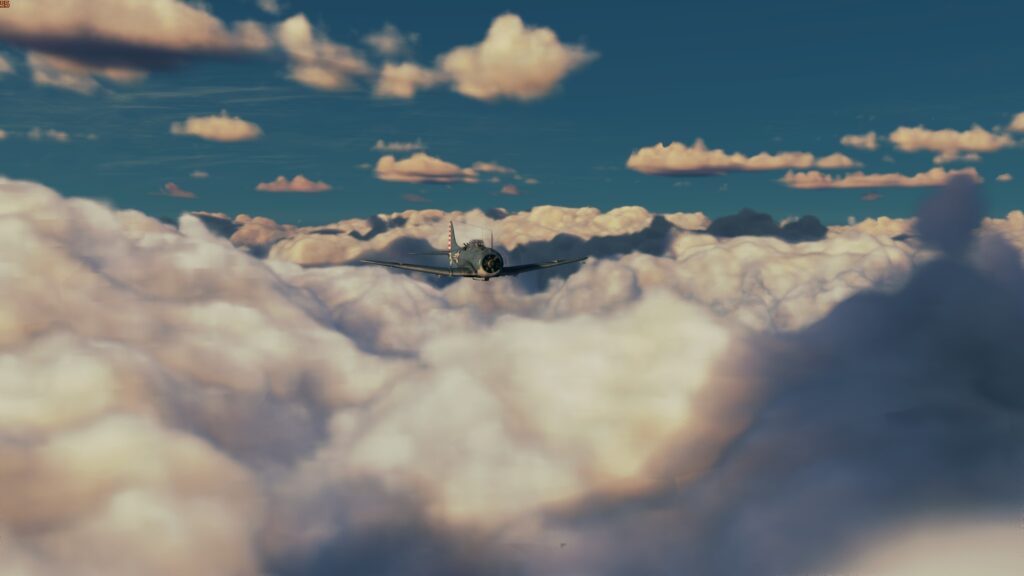
Task Force Admiral really wants to immerse you in a cinematic experience, and this carries through once a scenario loads, with an atmospheric 3D world and a dynamic, sweeping orchestral score accompanying every play session.
Once the sun rises (all scenarios currently start at night) and things get bright enough to appreciate the details, that 3D world looks very good indeed. It may not be at a AAA-game level of graphics, but Task Force Admiral’s art and 3D assets are smartly made, with environment graphics particularly worthy of praise. The ocean surface is dynamic, with the pitching and rolling of ships feeling just about right; the clouds constantly evolve and shift, looking good especially from a distance. While there are very few graphics options in the settings at the moment, the demo does come with a few colour LUTs (look-up tables) that can change the overall ambience.

My favourites are the default setting and a ‘midway 50’ preset which bumps up the contrast and saturation just slightly. The game’s unit models are well-designed, though not jaw-droppingly detailed. The developers clearly chose to keep an economical polygon count and optimized LODs (levels of detail), because the game has to keep up with a lot of units: a typical scenario right now will easily have a couple dozen ships and well over 200 aircraft roaming around the map in real time. I’m happy to report that in spite of this, even on my modest 5-year-old PC, the Task Force Admiral demo ran at a constant and smooth 50-60 frames per second, only dipping down into the 30s when the flak got heavy, still perfectly playable.
The large number of units all co-existing (or trying to shoot each other) in a big 3D world in continuous, uninterrupted time is what sets Task Force Admiral apart technically and conceptually. Other games with comparable graphics, like for example, War on the Sea, will generally have a simplified 2D “overworld” map – on which the player issues orders and units will launch, perform actions, and travel in an abstracted way marked with only a map icon. Only when their paths intersect with the enemy will the game generate a 3D battle covering a smaller geographical area and only certain units – and once the fighting is over, it pops back to the 2D map, factoring the battle’s results into the ongoing campaign. Even before 3D, many games (for example, Carriers at War) would split their mechanics into a simpler operations map mode and a more detailed combat resolution phase where units shoot and drop bombs. Task Force Admiral is different: there is no separation between operational movement and tactical combat; it only has the 3D world and everything takes place there, from airplanes moving between a carrier hangar and flight deck, to torpedoes slicing through the waves on the way to target.
Why is this even important? I think what Task Force Admiral gives the player, in a way no other game can for the Pacific War setting, is a very accurate sense of scale and timing – two things that are immensely important to understand about World War II carrier battles, which can profoundly change (or at least reinforce) one’s understanding of these events. A lot of historical debate about the Battle of Midway, for example, comes down to understanding the continuous space-time relationships – the arguments about the impact of the “sacrifice” of the torpedo bomber squadrons on where the Japanese CAP (combat air petrol) may have been, or their difficulties with getting their search planes out and a strike package spotted for launch.
A simulation that gives you turn reports or lets you watch numbers on a screen go back and forth might give you a very good abstract sense of the timing of events – but Task Force Admiral goes so much further by letting you see all of this play out viscerally in a 3D battle space. For me as a historian, it’s similar in impact to watching one of those “Titanic sinking in real time” videos (if you have not watched one before, I highly recommend it!). You might think you know it all from reading it in books, but being able to see it from different angles as it happens in the moment can be transformative, even making history feel suddenly more real and alive than you may have realized. And isn’t that one of the highs we all chase in historical wargaming?

My After-Action Report
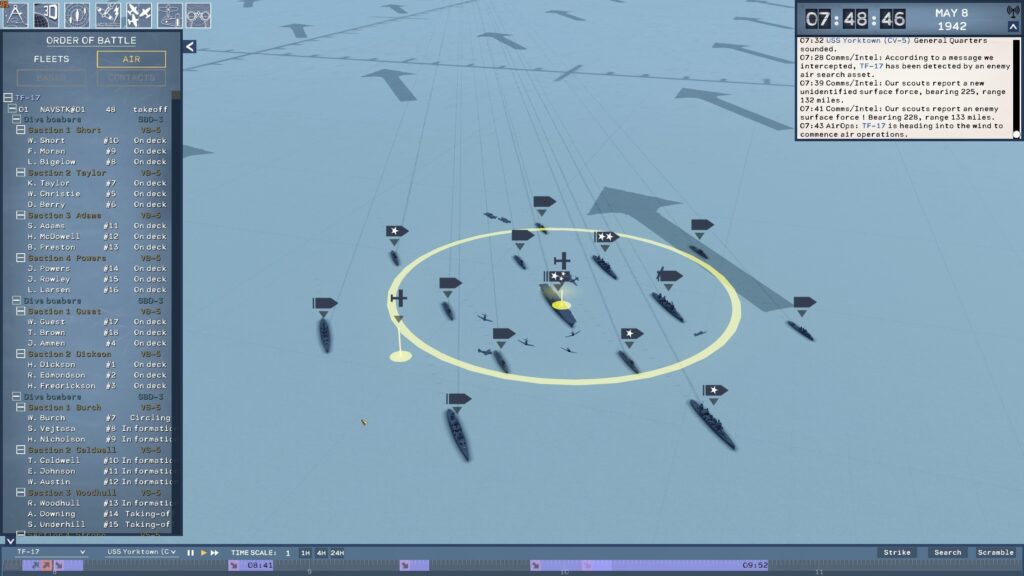
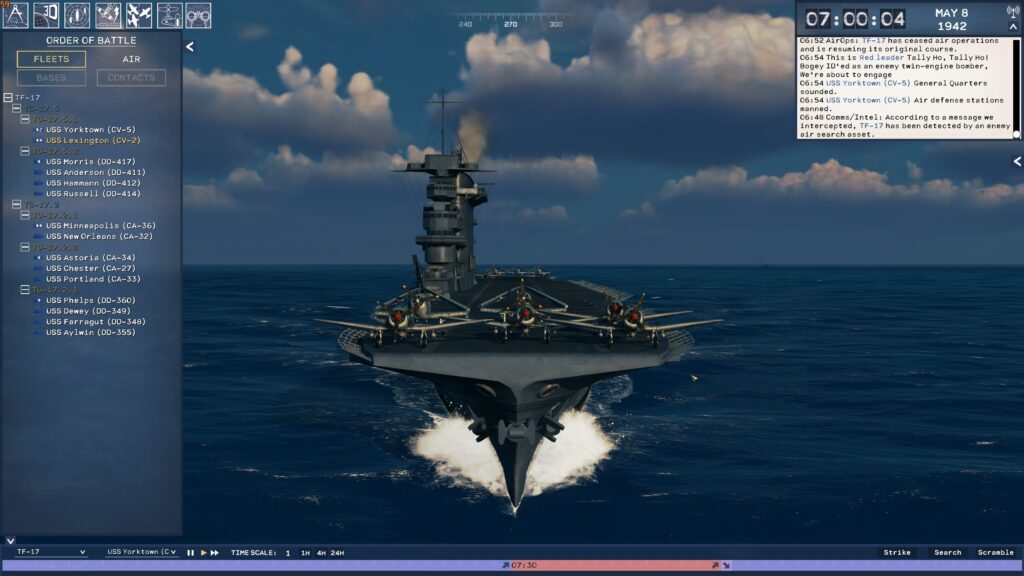
Playing the Task Force Admiral demo, I found myself using very little time compression – at least once dawn broke and air operations started. Loading up a battle for the first time might feel like information overload, but once you figure out what to do (with the help of the manual), you don’t even need to pause to give orders as you’ll have plenty of time to make your plans.
First order of business is to check the weather and figure out what course you want your task force to take. Do you close in on the enemy’s likely position before dawn, or head for an area where there looks to be more cloud cover? Then, the key thing is to figure out what resources you have on hand, and what you need them to do: so, you need a course, a best-guess of the enemy fleet’s position, a search plan to find them, a strike plan to hit them, and a CAP plan to defend against their inevitable attacks on your ships – and with the limitations of US carrier doctrine at that time (they were just not that good yet at coordinating aircraft from more than one carrier early in the war), your air orders will need to be made for each carrier’s air wing separately.
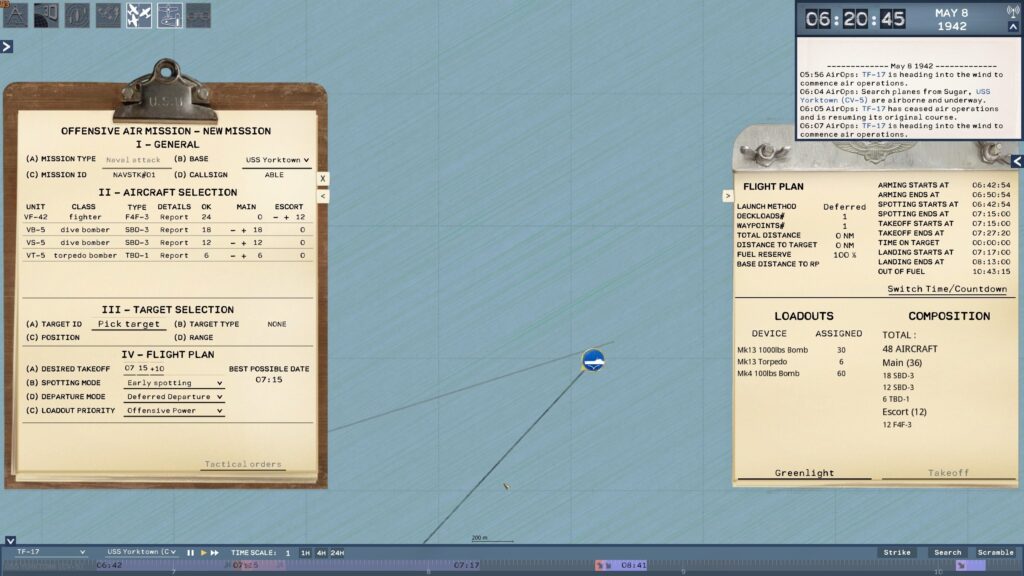
Over time, I’ve actually learned to start with the strike plan, counter-intuitive as it may first seem. You can pre-plan a strike without committing to launching or spotting it (i.e., putting armed planes on deck), and that will give you a crucial read-out on what planes you can fit on deck at once (you really don’t want to be launching strike packages of more than one deck load), what weapons they will carry, how long it will take to spot them, etc.
The most important quandary for strike composition is how many fighters you want to include as escort vs. how many to leave as CAP protecting the carrier, an especially pressing issue in the standalone Coral Sea scenario where the US carriers are woefully short of fighters. Then, you need to figure out a search plan. And you do want to leave some SBD (Scout Bomber Douglas) dive bombers aside (preferably from the designated VS- search squadrons) for that role, tempting as it may be to throw them all into the strike formation: the lumbering TBD (torpedo boat destroyer) torpedo bombers are just slower, shorter-ranged, and less efficient at the scouting role, though they will do in a pinch.
If you know the general direction of the enemy fleet (e.g., north), I found that setting aside a dozen SBDs (or 6 per carrier, if you’ve got two flattops in your task force) and getting them to search a 130-140 degree arc around that direction will do the trick. Finally, whatever fighters are left over should be used as CAP. I found it most effective to plan deploying them at maximum possible altitude (which seems to be 15,000 feet) and a position slightly in the direction of the expected enemy approach (at maybe 20-30,000 yards from the carrier).
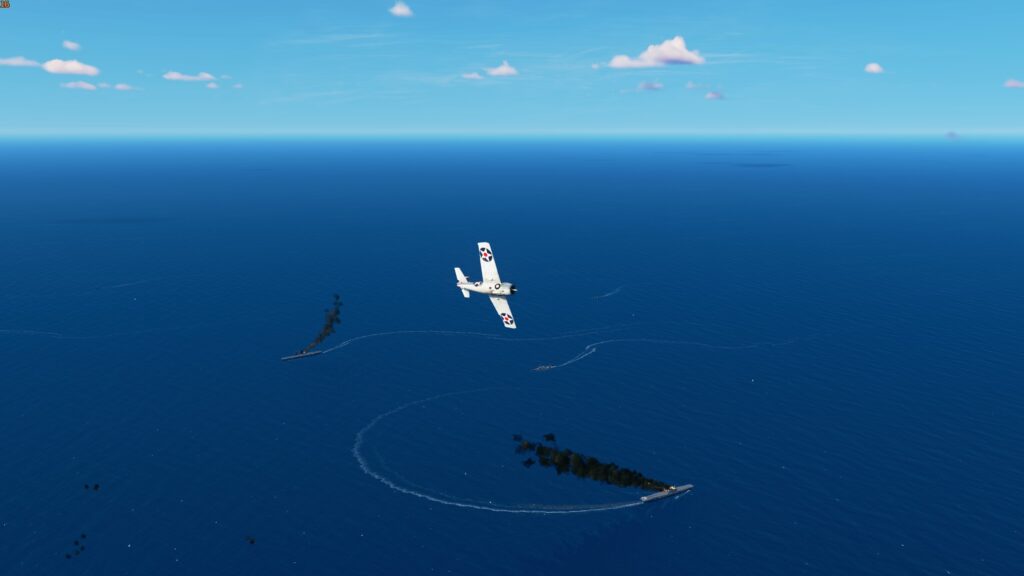
With that done, the player will have already made almost all the crucial decisions before the first plane even launches at 0600 hours (dawn in the current demo). The search planes must go first, without delay, so that you can get eyes on the enemy’s task force as early as possible.
As tempting as it may be to order your CAP out immediately after the scouts are out, I found that waiting some time – at least 30-40 minutes – puts you in a better position. The enemy always seems to find your task force anyway, and you can’t just count on shooting down their “snoopers” looking for your fleet. Meanwhile, a bit of a delay with launching fighters prevents scheduling conflicts with your strike package. I’ve found CAP to be more effective if launched 30-40 minutes after the search planes, followed by spotting the strike planes so that they’re ready to go as soon as you have contact.
The waiting game gets especially intense between about 0640 and 0800 hours. You don’t know when first contact will happen, but it almost always happens fairly early (in most my sessions so far, I usually picked up the enemy fleet about 120-150 nautical miles from mine – but the furthest was about 240 nm). Often, the first contact will actually be with an enemy scout looking for your fleet – but that can give you a very good idea of where it came from and even roughly how far it flew, which in turn can help you figure out when and if your scouts will sight their carrier. By this point, if you have not started putting your strike planes up on deck, you better get going!
The process of launching a strike generally takes 30-40 minutes, with planes moving from hangar to elevator to deck, and then taking off once all of them are assembled – an oddly satisfying choreographic show. At the moment, there are no 3D crewmen on deck, but it would certainly be neat if they were part of all the movements too (as per Task Force Admiral’s Kickstarter, it seems we will be getting animated crew in the final version).
The movements are quite dynamic. I have seen planes get moved to the sides so that another aircraft that is meant to be lined up further behind them can pass through, for example. The animations are not perfect, and you will see wings and tails clip through other aircraft occasionally, but it is certainly more detailed than anything we’ve seen in a WWII game so far. If you selected the “deferred departure” option when planning your strike (which is the better choice in most cases, except when the enemy TF is very far away), aircraft will circle over your task force until the whole strike package is airborne and on the way. Then, the next waiting game begins – who will strike first?

Most of the time, it’s the Japanese. This isn’t the game’s AI “cheating” per se. Rather, the IJN’s carrier air arm simply has certain doctrinal advantages that work in their favour at this stage in the war, meaning they usually get off the decks and on the way to targets quicker than their USN counterparts. It is certainly possible to surprise the enemy, if you get your strike package spotted on deck early and get lucky with scouting, but I have been able to get the first strike in maybe 1 out of 5 times at best. Not that it particularly matters. Whether or not you strike first, the enemy’s strike will still be out there looking for you, and you would have to be really lucky to avoid having to defend from it (I have not been so lucky in the demo. They have found me every time).
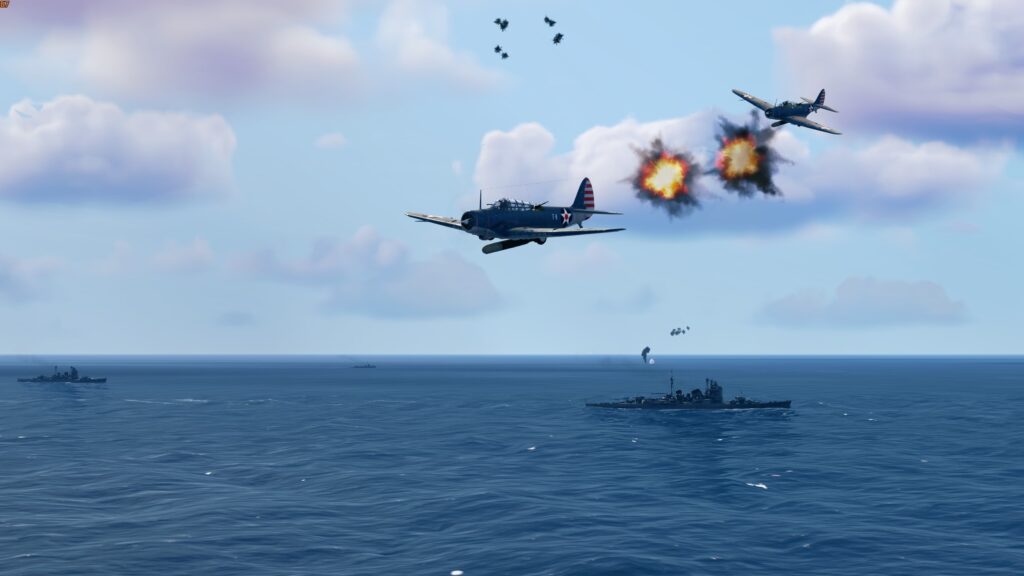
Both the player’s US aircraft and the AI Japanese aircraft, in my observation, behave fairly similarly. They do have different performance strengths but seem to largely use the same formations, procedures, and attack patterns. The only really notable exception are the torpedo bombers: the oft-maligned TBD Devastators on the American side tend to approach piecemeal and launch their torpedoes from quite a distance away from the target, rarely resulting in a hit, while the IJN B5N “Kates” swoop in with much more determination, almost always attacking in well-choreographed “pincers” that will trap your carriers in torpedo spreads coming from different directions. They are the most effective carrier-killers in the demo by far.

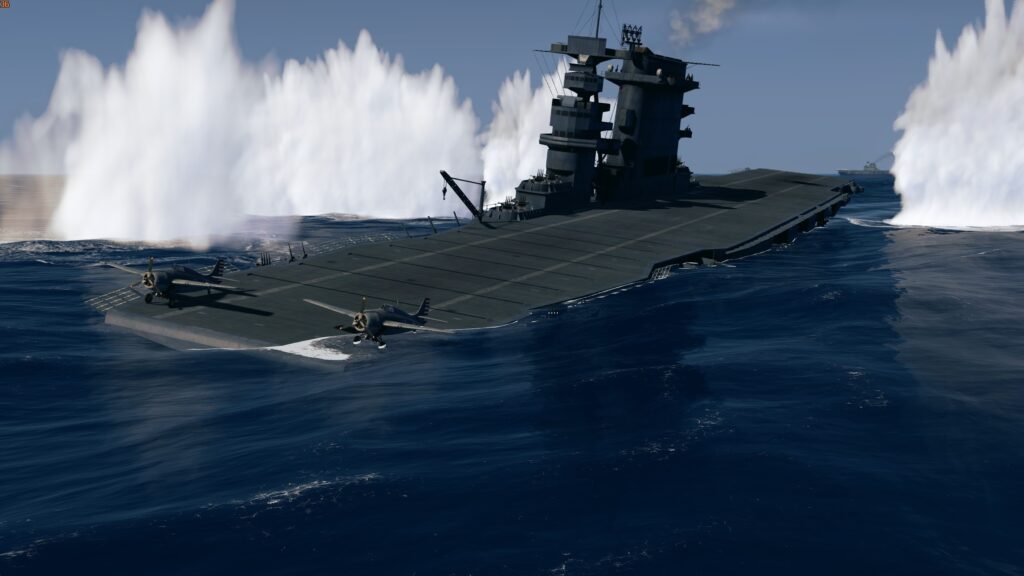
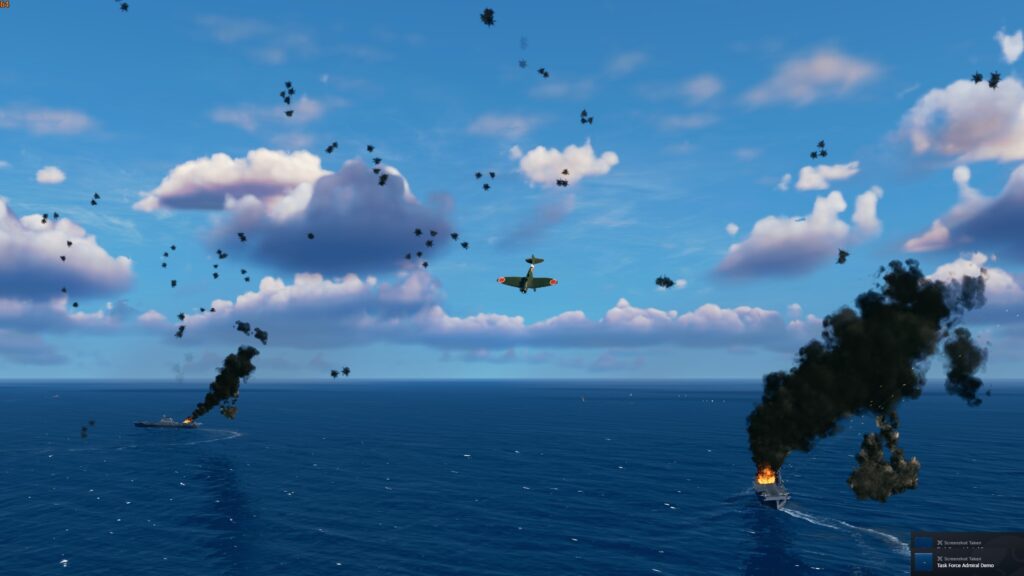
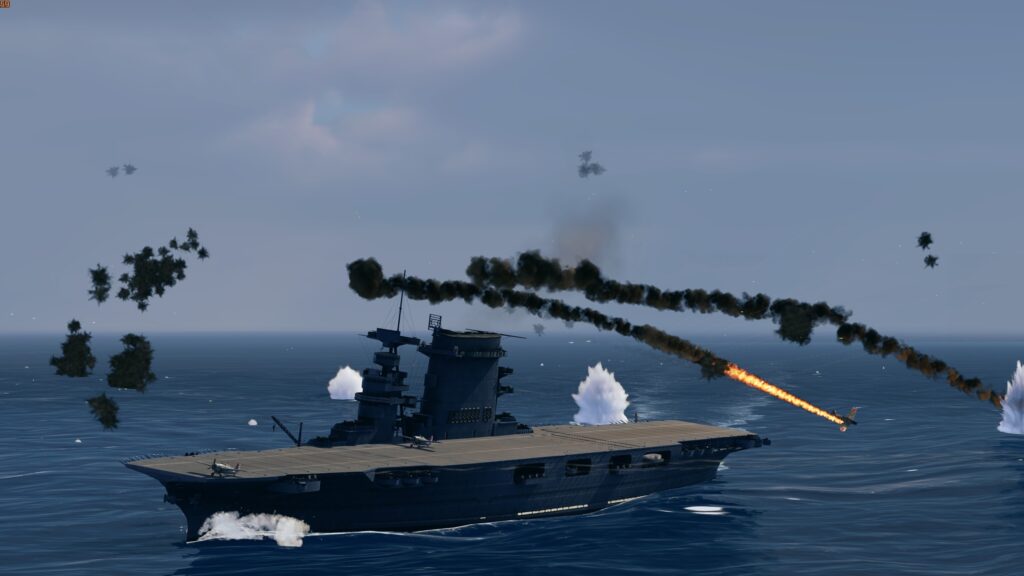
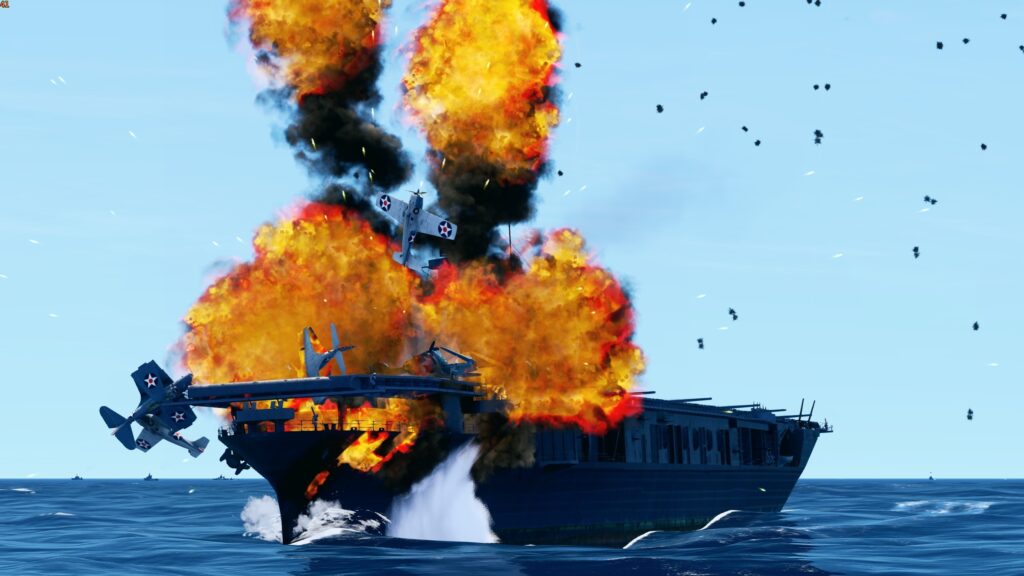
Once the enemy is in range and the flak starts flying, it really is an impressive view of disaster unfolding in real time. It’s downright unsettling how certain moments look to be straight out of WWII photographs of carriers under attack. Visually, the Drydock Dreams team have really nailed these moments of terror (that come after hours of waiting), and it is impressive to watch all this machinery of death come to life at the crucial phase of the battle. Unfortunately, in the demo there is not much for the player to do through these moments except watch. You have no control over your planes after you order a strike or CAP to be launched, and no control over your ships once the alarm is sounded and they begin executing their own evasive maneuvers.
In this, the promised additions of controllable AA mounts, fighters, and ships in the final release will probably be a welcome addition for many players. By the way, the demo does include a basic demo of “fleet defender” fighter gameplay – featuring fairly arcade-level controls, most reminiscent of something like the Battlefield games, but perfectly entertaining and serviceable. It’s not my thing personally, but I think some players might enjoy it!
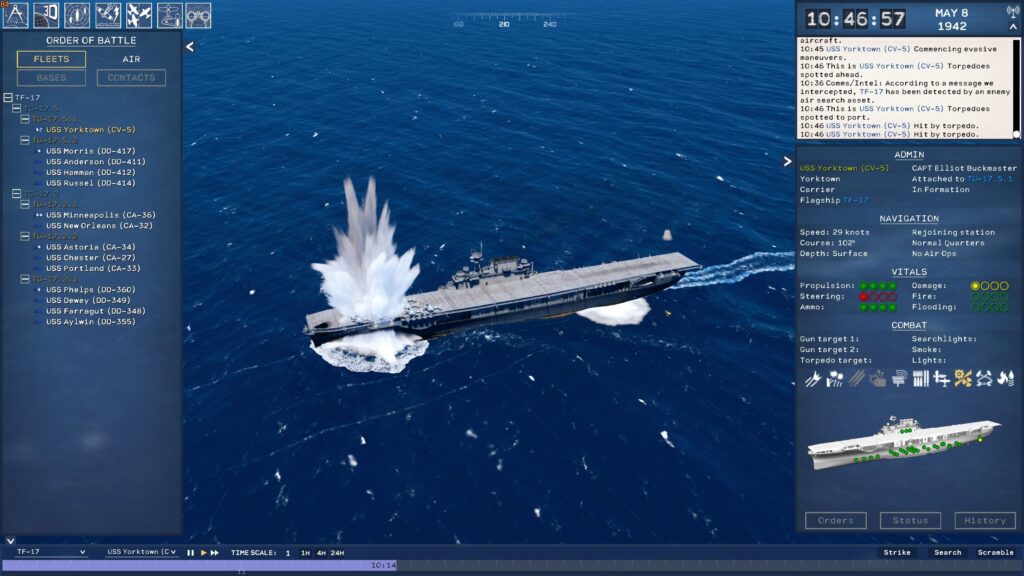
Surviving an enemy attack on your carrier force and succeeding in hitting the enemy’s flattops in the demo is largely a matter of luck. This isn’t to say the player’s decisions don’t matter, but at the moment there is fairly little influence the player has in terms of tactics. It’s certainly worth experimenting with what little you can control, but it will eventually lead to the (historically correct) conclusion that your options are narrow in terms of what actually works: the correct answer is almost always a tightly-organized strike package (using the “deferred departure” option) composed of the maximum number of aircraft that you can fit in a single deck load, with at least a few escort fighters to break through the enemy CAP.
If you have two carriers – timing your strikes in quick succession is always better than spacing them out. The name of the game is saturation attack, and the enemy excels at it too. Once the smoke clears, count yourself lucky if you got away with only damaged ships in your task force (and none sunk), and managed to get a few hits on the enemy. The manual quite correctly cautions that “strategic draw – tactical draw” is the expected result, and that was indeed the typical result in my battles. The separation of scoring into “tactical” and “strategic” results is very welcome, and I am curious to see how this will play into the final game, especially once it has a campaign generator (a post-released feature recently promised via Kickstarter).
A Simulated World of Carriers and Fighter Planes
One detail stood out to me as an avid flight simmer: with so much going on and so many AI-controlled units in the game world, I expected that certain aspects would be simplified to save CPU resources—so I was pleasantly surprised by the places where they weren’t. For example, I assumed carrier takeoffs would be simplified, with airplanes performing the same “canned” animations, as though attached to the carrier on a string. Imagine my surprise when that wasn’t the case! With the ship’s deck pitching in the waves, airplanes would sometimes get airborne early, sometimes bounce when the deck rose to meet them, and sometimes drop precariously off the bow.
The same applied to landings—planes would sometimes touch down short, sometimes long, catching different arresting wires. As the forward part of the deck filled up with landed flights, safety nets would be deployed, and occasionally, recovering planes would even get tangled in them, stopping their propellers immediately. While I don’t think landing accidents, technical failures, or friendly fire are explicitly implemented in the game just yet, I have seen aircraft go down shortly after takeoff due to failing to gain altitude or get shot down by friendly AAA while chasing torpedo bombers. This suggests that the game’s underlying systems aren’t just smoke and mirrors but part of a well-built dynamic simulation. Details like these elevate the game into something special, and I look forward to seeing even more of them as TFA develops!
Possible Improvements
As noted earlier, it would be unfair to “review” a free demo of an early alpha build—but I do want to highlight a few negatives to set reasonable expectations for those who wish to try it. I’ll cover three general issues, plus one broader observation:
1. Crashes and Glitches
The demo has its fair share of crashes and glitches. Interestingly, these seem to happen overwhelmingly (though not exclusively) in the Coral Sea single scenario that comes with the game, whereas battles generated through the battle generator tend to be more stable. I suspect this may be due to custom scripting and non-standard numbers of aircraft on carriers in the standalone scenario.
The only truly game-breaking bug I encountered was aircraft getting stuck while moving on deck, completely halting carrier operations. Other issues were more puzzling—such as the music occasionally stopping for 10-20 minutes before resuming, or orders (like task force formations, launch timings, and scramble commands) being treated as mere suggestions by the AI, sometimes executed with long delays or ignored entirely.
These are fairly typical teething issues for an alpha version, and the game’s autosave feature (every five minutes) usually helped me recover when things went sideways. My advice? Start with the battle generator—especially for your first attempt. Try a one-carrier vs. one-carrier battle before diving into anything bigger!
2. Missing or Incomplete Features
As the manual notes, many game functions are currently incomplete or absent. Some core mechanics are simply not implemented yet.
For instance, while damage modeling is quite detailed, some components (such as AA mounts) don’t appear to be damageable. Sinking and aircraft destruction mechanics are also minimal—when a carrier is fatally hit, it drops like a rock, with any planes still attached to the deck, even if the ship goes vertical. There are no pilots bailing out of stricken aircraft, and while carrier decks visually take damage, it doesn’t seem to impact operations (planes still roll over and park on breaches in the deck with no visible provisional repairs).
Weather is another example of unfinished functionality. While the clouds look fantastic, they don’t appear to impact visibility. In my experience, task forces are detected regardless of weather conditions or aircraft altitude relative to cloud cover, and I’ve routinely seen dive bombers pass through clouds on their way to a target. This is bound to be a key feature in the future, but for now, I recommend setting “light clouds” in the battle generator—you’ll enjoy TFA’s beautiful cloud visuals without being too distracted by planes “seeing” through overcast skies.
3. The User Interface Needs Work
The UI is still rough around the edges. While some aspects—like the strike planner, 2D operational map, and formation editor—are intuitive, others feel clunky.
The tactical view (activated with the spacebar) should, in theory, provide a simplified 3D representation of ships and aircraft to help orient the player. In practice, however, it’s not very useful at the moment and needs significant refinement.
The most difficult menu by far is the Order of Battle (OOB) sidebar display, particularly for aircraft management—which is crucial because it’s one of the only ways to track and monitor your planes after they leave the carrier. Expanding the list to show individual aircraft requires multiple clicks, and flights sometimes vanish from the list entirely. For example, if a carrier is sunk, all its flights disappear from the OOB, even though they’re still out there, effectively making them untrackable. I’ve also had strike packages disappear while returning from a mission, even when they were still 100 miles from home base.
Again, this is expected for an alpha build, but navigating menus and tracking airborne units can be frustrating. This is an area that will clearly need refinement as TFA develops.

4. A General Observation: Limited Player Control
Although the TFA demo is packed with details—sometimes to the point of feeling overwhelming—your actual ability to interact with the game and influence the outcome is quite limited right now.
You may be the admiral giving orders, but you have no guarantee they will be carried out as intended. I often found myself wishing I could somehow cajole my ships and aircraft into hurrying up! The AI treats waypoints and formations as loose guidelines at best. I’ve had one—or even both—of my carriers drift completely outside their protective destroyer and cruiser screen in the middle of an attack, with no way to reposition them. At other times, I’d order an urgent strike, only for the carrier to prioritize launching a routine CAP 15 minutes later—delaying my attack by 20+ minutes and allowing enemy bombers to arrive first.
In another instance, I ordered an emergency fighter scramble, only for my carrier to prioritize recovering search planes instead. As a result, my idle fighters were blown off the deck by incoming enemy dive bombers, despite having had ample time to launch.
Luck also seems to play a significant role. Reloading a save at the start of an attack produced wildly different results—ranging from barely scratching enemy ships to completely destroying one or more carriers. On the one hand, this shows that outcomes are dynamic. On the other hand, it can sometimes feel unfair, as if results are determined by chance rather than player decisions.
At times, the demo felt more like watching a “disaster in real time” unfold rather than actively participating in it. A visually stunning disaster, no doubt—but after a few playthroughs, you may find yourself craving more direct control.

Final Thoughts
Despite these issues, I have a lot of confidence in the TFA team. The foundations are solid, and while there’s still a long road ahead, this demo makes it clear that the game is a labor of love, one the developers are deeply committed to.
Beyond the impressive visuals, it’s evident that the Drydock Dreams team has put serious thought into the complex systems required to bring this game to life. The presentation—from the detailed briefings and well-crafted demo manual to the immersive music and graphics—is top-notch and reminiscent of beloved ’90s-era simulations.
The developers are also refreshingly transparent about the game’s current limitations, clearly outlining missing features in their documentation without overselling the hype. I wish them following seas and look forward to seeing what they accomplish in the months and years ahead!